Activated Checklists are a game changing workflow tool that help your team stay on top of what they need to do and when. And with our latest enhancements to Decision Points, it’s even easier to make sure you’re capturing your processes correctly.
The Decision Point
One of the step types in Way We Do Activated Checklists is the Decision Point. You can set this up to occur at a point in the process where your team member needs to make a choice. It might be a simple Yes or No situation; or it might be more critical, like selecting the value of goods you’re purchasing. What ever that decision point is, it’s where the process flow diverges along different paths, depending on the choice that’s made.
When creating a Decision Point step, you’ll need to set up a Condition. You’ll then need to define what subsequent steps will appear based on the choice your team member makes. It’s like a Choose Your Own Adventure story. (Kids from the eighties will know what we’re talking about).
Watch our 7-minute tutorial to learn exactly how to create Decision Points in your Activated Checklists, or read on for a step by step guide.
How to add a Decision Point to your process
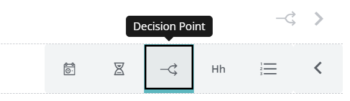
As we said earlier, Decision Points are another type of step in Way We Do, so when you’re adding step you want to be a Decision Point, simply select that option from the options list. The Decision Point option looks like an arrow splitting in to two.
Once you’ve created the step, you’ll need to set up the decision criteria. Just like an Activity Step, you can assign a responsible role, add in a dependency, and turn comments on or off. A Decision Point step is always mandatory, so once you’ve included it, you won’t see the button to make it optional.
There are two different types of Decision Point you can create.
- Inclusive – This allows the user to select more than one option (i.e. multiple choice)
- Exclusive – This means the user can must select one option only (i.e. single choice)
The best way to frame a Decision Point is like a question, with your Conditions then set as the variable answers to that question. And – just like a Choose Your Own Adventure story – the choice you make determines how the rest of the story plays out.
Let’s dive in to this with a bit more detail
The scenario
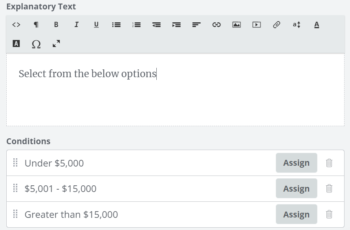
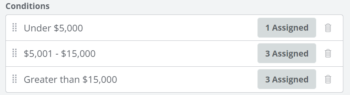
We’re creating a Decision Point that asks a question – “What is the value of the goods being purchased?” – to which there are three possible answers:
- Under $5,000
- $5,001 – $15,000
- Greater than $15,000
In the Condition, we enter the three options, and define what happens for each if it’s selected. We do this by assigning steps.
For this Activated Checklist, the process for the different purchase values are:
- for purchases under $5,000, go ahead and create the purchase order
- if they’re between $5,001 and $15,000, source a quote and get approval from a manager
- anything above $15,000 requires three quotes and approval from the CFO.
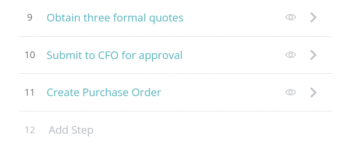
Each option reflects a different journey, which will need appropriate steps to follow. Here, we’ll need a “create purchase order” step, two steps about getting quotes, and two steps about getting approval from the different people. It’s these steps that we’ll be assigning to the Condition.
- Under $5,000 > Create a Purchase Order
- $5,001 – $15,000 > Source a quote > Submit quote to manager for approval
- Greater than $15,000 > Source three formal quotes > Submit quotes to CFO for approval.
During an active Instance, when a user selects an option, only the steps that are relevant to their choice will appear. This way, your team members are given the right path for the task they’re completing, and only the task they’re completing.
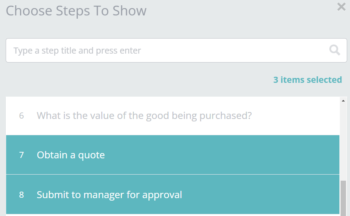
When we’re assigning steps to the different Conditions, a pop-up shows every step in the process. It automatically takes us to where the Decision Point is within the process so all we need to do is choose the steps we want users to follow under the selected Condition.
(To help make assigning steps easier, we’ve included step numbers. There’s also an Items Selected counter that shows you all the steps you’ve selected so far.)
Now we’ve confirmed everything, Way We Do shows us how many steps we’ve assigned to each Condition.
Note, when you’re viewing the checklist, you can the see steps that have Conditions by looking for the eye symbol. This tells you that it’s a “Revealed Step” that will only show the relevant steps once a Condition is selected.
Need some help?
If you need help getting your Decision Points up and running the way you want, remember to reach out to support@waywedo.com. We’re always happy to help.