Way We Do’s Activated Checklist tool helps make sure you and your team are completing all the necessary steps in a process or activity. What makes a Checklist ‘Activated’ is that rather than simply ticking a step off, users active engage with each item in the process.
When you create a Checklist Instance – that is, run or “activate” a checklist – there are a few preliminary steps you need to complete. One of these is to give the Checklist Instance a unique title. For many years, the default title in Way We Do has been simply “Activity Title”. Practical, yes. Inspiring, no.
But thanks to our fabulous developers and an idea from one of our equally fabulous Way We Doers, we’ve changed things up so you can now customize this field to match the intent behind the checklist.
Let me show you how it works.
Current default view
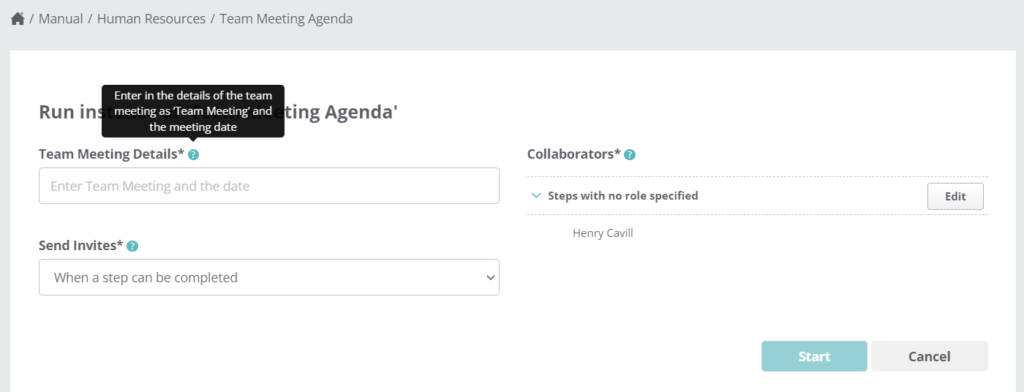
Here’s the set-up screen for creating a new Checklist Instance. The top-left field –Activity Title – is where you give it a name.
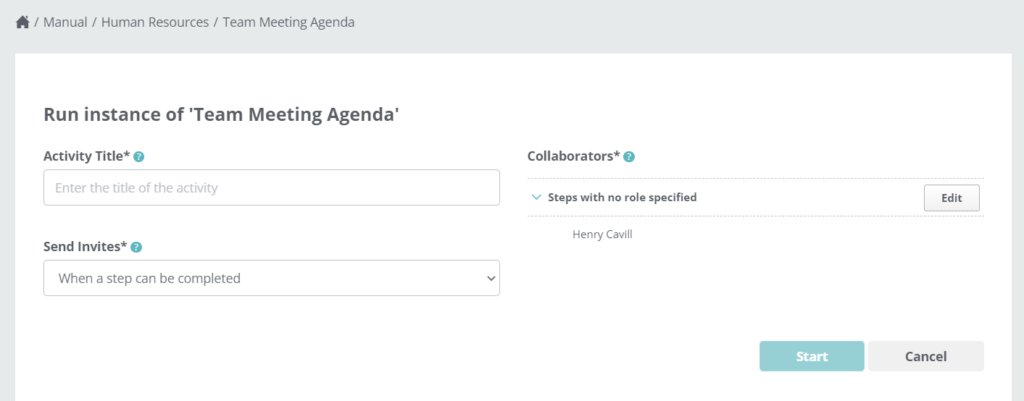
At present, the Activity Title field comprises three elements.
- The name of the field: Activity Title.
- A blue question mark (help text): Information about the field that displays when you hover the cursor over it.
- Placeholder text: Light grey text that prompts what text to enter into the field.
However, depending on which checklist you’re running, “Activity Title” may not be the right term. The checklist may not be for an activity, but for something else, like a team meeting agenda. In which case, “Activity Title” doesn’t quite fit the bill.
This is where our new feature comes to the rescue. By letting you customize this field, you can provide better context for the Activated Checklist.
Customizing the Checklist fields
Each Checklist now has a “Settings” button, shown as a wheel icon, located near the bottom of the options list on the right. Click “Settings” to start customizing.

This will bring up a new screen showing four fields.
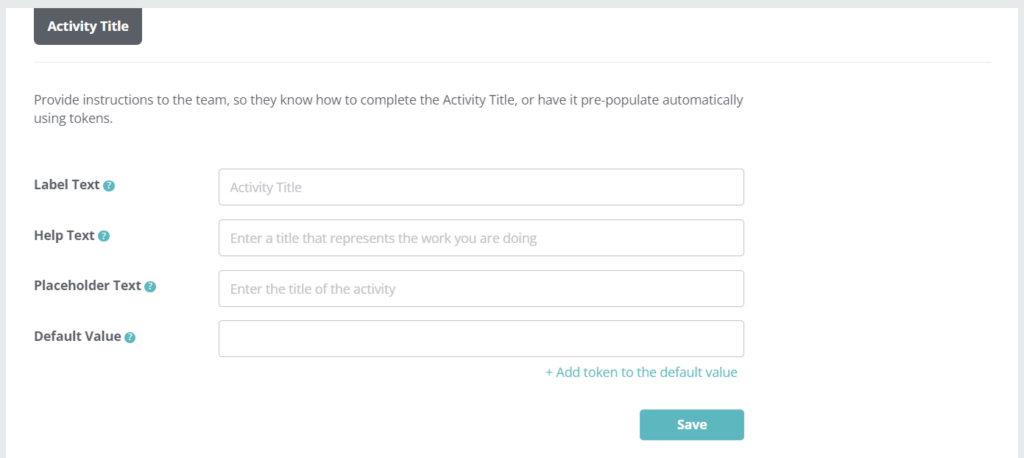
- Label Text – The current default is, as you know, “Activity Title”. Enter the new field label in no more than five words.
- Help Text – This is the explanatory text that appears when a user hovers over the blue question mark. Give a brief explanation of what the user should enter in the field.
- Placeholder Text – This appears in the field itself. Think of this as a succinct version of what’s in the Help Text.
- Default Value – This can help you establish a naming convention or other consistent practice for naming Checklist Instances.
Let’s run through an example
Carrying forward our example of an Activated Checklist for a Team Meeting Agenda, we’ll make the following changes.
- Label Text – We’ll change this to “Team Meeting Details”.
- Help Text – We’ll change this to “Enter in the details of the team meeting as ‘Team Meeting’ and the meeting date”.
- Placeholder Text – Our text here will be “Enter Team Meeting and the date”.
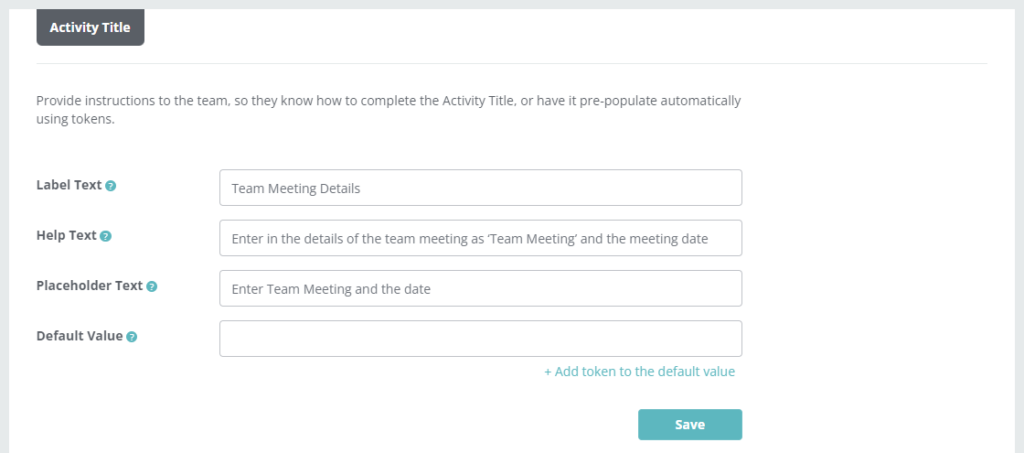
Next time we run a Checklist Instance for a Team Meeting Agenda, our setup page will match the type of checklist, and its purpose, so it’s much clearer for your team.
Creating a Default Value
Our example above didn’t mention the Default Value, because I wanted to go into a little more detail about why it’s important.
It’s good practice to have your Checklist Instances follow a naming convention. It helps create consistency, and it is extremely useful when you want to search for a previously run Checklist Instance.
To this end, we’ve created a Default Value option in the customization settings. This is where you can create a standardized Instance Title that will auto-populate when the Checklist Instance is run.
You can use free text, a Token, or a mix of both free text and Tokens to create your Default Value.
Tokens
First up, what is it? A Token is like a little code that updates the field based on circumstances around when the Checklist Instance is created.
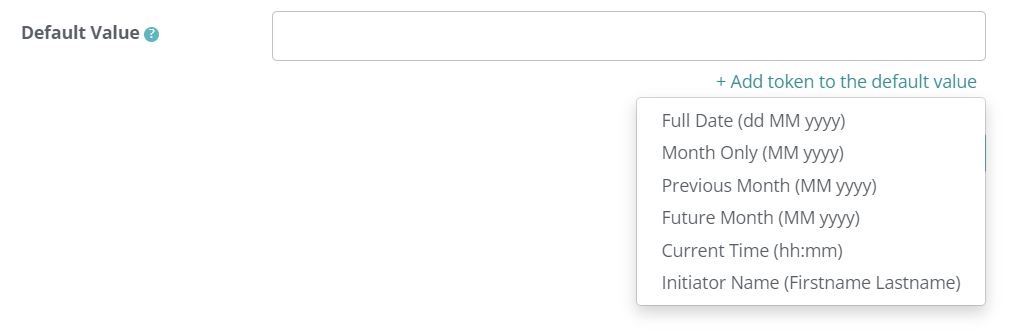
You can choose a different token depending on the information you want to capture. Simply click on the + Add token to the default value link beneath the Default Value field to select from the following.
- Full Date (dd MM yyyy) – This will display the full date of when the Checklist is run, in the format dd MM yyyy, e.g. 21 Apr 2023.
- Month Only (MM yyyy) – This will display the month and year in the format displayed, e.g. Apr 2023.
- Previous Month (MM yyyy) – This shows the previous month in the same format as month only, e.g. Mar 2023.
- Future Month (MM yyyy) – Shows the future month in the same format as month only, e.g. May 2023.
- Current Time (hh:mm) – Displays the time you pressed the run button, in 24-hour format, e.g. 14:25 (for 2:25pm).
- Initiator Name (Firstname Lastname) – Shows the first and last name of the team member who presses the run button.

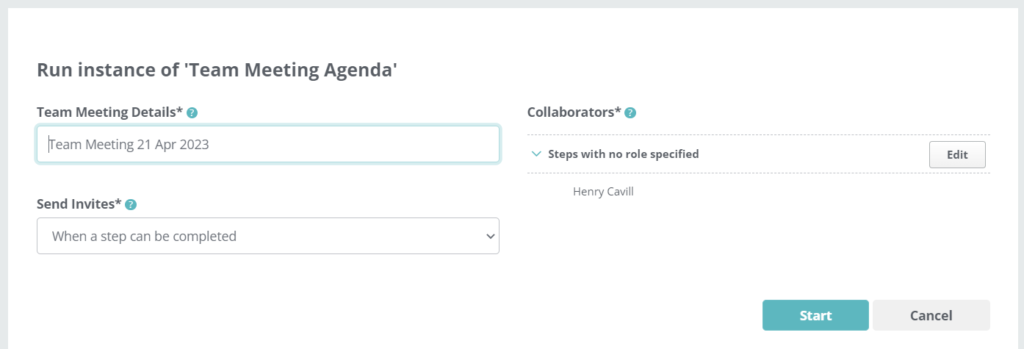
For our Team Meeting Agenda example, we created a default value of the words “Team Meeting” and added the Full Date token. Now, when we create a new Checklist Instance, the title populates automatically.
A new clarity for Activated Checklists
This new feature should bring a greater sense of clarity and consistency for how you and your team run Activated Checklists in the future, and keep things running ever smoother.
If you need more help, check out our Support Article, or reach out to us at support@waywedo.com.